Sunday, March 8, 2015

March Macaron Madness


Hello there and Welcome back!

So for quite some time I have had on my baking bucket list the illusive macaron.  So far I have been successful in avoiding the project for real and imagined reasons, the bag of Almond Meal flour ahs remained untouched and in my freezer, I have woken up in a cold sweat dreaming about this little delicate morsel, I have read up on it, did my research, went to a bakery in Columbia called Lady Antoinette's with my sister and had the opportunity to taste and yes, enjoy the macaron and yet my heart still stops cold when I think of making these little gems.  Some of the posts that I read from experienced bakers go on and on about how very difficult it is to transform 4 or 5 basic ingredients into the most beloved cookie; although in my estimation this is much more than a cookie,  However, I have come to learn recently that the longer you put your dreams off the more impossible it will be to make them come true because the fear of failure will paralyze you from being a success!

This is the month that I finally will make the plunge, I finally have the determination, confidence and knowledge where I feel somewhat comfortable taking on this task.  It also seems that I have the perfect occasion for it as well.  I was asked to make a few things for a small wedding and me thinking small is 10 said yes, but when I learned small was more like 50 to 75 I just jumped at the opportunity to try to surprise the bride with a delectable morsel you can only get in bigger cities made by top notch professional chefs - no pressure here.  In doing my research I learned that March 20 is National Macaron Day and thought how fitting, how appropriate and yes how Kismet as the wedding is on April 4th!  

Being the OCD person that I am decided to read up on the beloved macaron once again and do as much advanced preparation as humanly possible.  On the counter of the kitchen in a corner away from wet areas are the DO NOT TOUCH, mise en place items for the baking expedition.  .  I separated the eggs.  I also took the liberty of drawing a transfer sheet, for lack of a better word, that will fit underneath the parchment paper so that all of my macarons are the same uniformed size - 1 inch in diameter.  There are 20 1-inch circles which means 10 cookies.  It does come to my attention that in order for 50 people or couples to have 2 cookies I will have to make 10 sheets of these, thankfully, they store well for a week in an airtight container.  I have a little under a month to get this right and that is good because I am the ultimate perfectionist, especially when it comes to my baking!  My ultimate goal for the bride and grooms big day is to get the mini Chinese takeout boxes in one of the fabulous colors of the wedding and put two macaron's in each small box.  However if I cannot find these boxes for some odd reason I think that I will just put them on a tray, however when they are on a tray there is no guarantee at that point in time that each person will get two because someone is going to eat yours!

Below you will find pictures of what some of the things I have done this morning in preparation for making the first macaron tomorrow!  In the next few days you will have the recipe that I chose, the difficulties I found,if any. and what I plan to do the next time to prevent whatever issues I had with the challenge before me.  Until then please stay tuned and wish me luck with my new found obsession - The Macaron


1" circular "mold" for macaron size conformity

Top side of Macaron Mold (trace circle from the inside)

Macron "Mold"


Three Egg Whites

Three Egg Yokes


Tuesday, February 24, 2015

UPDATE!


So it is pretty obvious that I have not been keeping up with this food blog; and while no apologies are forthcoming, I do think that maybe you would like to know what I have been up to; if so than read on Sometimes life is all consuming and sometimes far more important than writing it down for others to read is just living it and being in the moment of it.

When I last posted I had moved to Ocala Florida; well, that was a short-lived under a year trip and nowI am back! Florida was an experience but basically the same small town mentality and atmosphere as Holden Beach but without the beach and without my children who I missed dearly for the 10 months I was away.  So I figured that since the adventure did not work out like I had planned I would rather be back in my own small town with my own small town mentality with the people I knew and loved.  At the end of the day the "non-risk-taker" took a risk and it turned out to be exciting in the beginning, normal in the middle, a bit of a challenge towards the end but all in all by the time it was all said and done I was ready to come home, with absolutely no regrets.  My only regret would have been not taking the risk and always wondering about a missed opportunity.  I have been back home in North Carolina for about 4 months and keeping to myself for the most part, I have spoiled my two teens rotten with different food experiments, late night french toast, early morning taco omelets, and I have been dedicated in working out 3 to 4 times a week.  I have reconnected with old friends and met a few new ones.  All in all, nothing exciting, just life in general which is a great thing in and of itself.

I have learned a lot since I have been back; I have learned to love grapefruit. I hired a personally trainer briefly, thinking that maybe I could get a little bit more of an edge to my existing workout and eating habits (aka diet) only to discover that everything I was being told I was already doing or already knew.  The one thing I did take from it is to stop second guessing yourself and your knowledge, have a little more faith, try some new things and oh, I now LOVE grapefruit thanks to the trainers advice to eat 1/2 a grapefruit in the morning.  But it has to be red grapefruit!  I learned to drink green tea with honey and I am averaging about 2 cups a day, as someone has been smart enough to make a  Chai Green tea and there is nothing I love more than chai tea!  I still have not made macarons and I have the almond flour in the freezer, my fear of messing it up is overriding my desire to conquer the task, however, I felt that way about cream puffs and when I made the pate a choux and discovered how easy it was I could have kicked myself for not doing it sooner!  I have learned that you can literally make any thing you can think of in a crock pot and pinterest will have a recipe for it!  It really helped in those randomly cold winter days like today where my kids have off of school.  I made "award winning chilli" which I had to tweak because it was absolutely devoid of heat.   Thank God for Siracha and McCormicks Southwest No Salt Spice!!!  The best part was that my kids had no idea I made it with ground turkey and I am taking my secret to the grave!

I recently discovered a new fitness place in town, right across frommy development.  One thing about living in a small town is that they sometimes do not have the "new" ideas when it comes to fitness and I am not driving an hour to Wilmington OR Myrtle Beach.  I have always been curious about meditation and chakra balancing; their blog is quite informative.  They teach a yoga class called Buti Yoga which looks really intense when I watched the YouTube video from the creator. They also teach a Piloxing class which mixes one of my favorite sports, boxing, with Pilates, cardio, some dance moves and floor work and the class is an hour long which means I do not have to spend 30 minutes on the gerbil-mobile!  They have more than one type of yoga class, which I find amazing since I only thought there was one and now we are in the age where there is gentle yoga, power yoga, Buti Yoga, hot yoga.  I am really excited that something like this is right across the street from my development and cannot wait to go try it out.  Oh and the best part? They offer a class on Samurai Swords every other Saturday....WHAAAAAAAAAAAAT???? Yeah you heard me! Unbelievable! Now I need to get a sword, or in my case a plastic stick that I can't accidentally poke someone's eye out with! 

Alright, you have been updated and may now go on about your day doing random acts of kindness, eating good food and drinking something warm and cozy until this weather warms up!

Saturday, August 9, 2014

Lemon Curd

This was insanely easy to make and of course I had to share my delight so after making it I put some of it in  jars and gave them away to a few people and they absolutely loved it!  I also made a pie (pictured below) My recommendation?  Make shortbread cookies and put lemon curd in between two of them for a delicious treat 

3 oz. (6 Tbsp) unsalted butter softened to room temperature
1 cup granulated sugar
2 large eggs
2 large egg yokes
2/3 cup fresh lemon juice
1 tsp. grated lemon zest

In a large bowl, beat the butter and sugar with an electric mixer, about 2 min. Slowly add the eggs and yolks. Beat for 1 min. Mix in the lemon juice. The mixture will look curdled, but it will smooth out as it cooks. 

In a medium, heavy-based saucepan, cook the mixture over low heat until it looks smooth. (The curdled appearance disappears as the butter in the mixture melts.) Increase the heat to medium and cook, stirring constantly, until the mixture thickens, about 15 minutes. It should leave a path on the back of a spoon and will read 170°F on a thermometer. Don't let the mixture boil.

Transfer the curd to a bowl. Press plastic wrap on the surface of the lemon curd to keep a skin from forming and chill the curd in the refrigerator. The curd will thicken further as it cools. Covered tightly, it will keep in the refrigerator for a week and in the freezer for 2 months.


For key lime curd, substitute fresh lime juice (or Nelly & Joes Key Lime Juice) and a little key lime zest.

 ** I had step by step picture instructions but somehow (when I dropped my phone in the toilet at Animal Kingdom) a bunch of photo's were not synced back to my google photo's.  I do however have a picture of the curd in a graham cracker pie shell for a pie that I made for my cousins.  It was gone in under two days and was wonderfully tart, creamy and refreshing!  Enjoy

Wednesday, February 26, 2014

Just a Little Note


It really has been a very long time since I have actually HAD time to "blog" what I have been cooking.  I can say with all honesty that I have not been all that dedicated in my persuit of "new challenges" where desserts are concerned.  

On a personal note I took a risk and moved 900 miles to a new town in Florida called "Ocala".  I have been here seven months, had the same job for seven months and love the area, the people, the sunshine and the positive attitudes of those I choose to surround myself with.

One day you will return to "Gypsy Land" and see something new on the blog.  Until then, happy eating and remember that you eat with your eyes but if you make the food right all of the senses are enhanced and the impression you make on others are memories that will  last a lifetime!

Monday, September 16, 2013

Pineapple Upside-down Cupcakes


I wish my picture taking abilities did these cupcakes justice!! they are SO good!
When I was little my mom used to make a few "famous" desserts; chocolate chip cookies, banana split cake, Pistachio Pudding (which we now know as watergate salad) and Pineapple Upside Down Cake.  So for me, turning this into a cupcake and adding buttercream was crucial.  As usual folks, I did not follow any certain recipe but made my own up after unsuccessfully trying to follow someone else's.  The results? A hit!!!! I guess you can say that I am called to bake and am the reigning Cupcake Queen, at least in my area; hope you enjoy!

Cake:
1 box Butter Recipe Cake Mix
INSTEAD OF WATER USE THE PINEAPPLE JUICE FROM THE PINEAPPLE

Brown Sugar Buttercream:
Bailey's Brown Sugar Vanilla Creamer
3 cups confectioners sugar
2 sticks butter, softened (1 cup)
a handful of brown sugar (generous)
**this recipe will ONLY decorate 15 cupcakes if you are as frosting happy as I am**

Garnish:
1 can pineapple chunks
1 jar maraschino cherries

Line 2 muffin pans with paper/foil.  Follow the instructions on the box and if you are like me do NOT pay attention to the instructions that tell you how much to fill them, I like my cupcakes with a "mountain" instead of flat, be generous folks, you only get one chance to impress someone with a cupcake and brighten their day.

While the cupcakes are in the oven is a good time to make the buttercream.  Whip the butter and add the confectioners sugar a little at a time because if you are using your kitchen aid mixer, the force of the mixer and the air will blow the sugar all over the counter, you only need to do this once and you will learn :).  Grab a generous handful of brown sugar and add it to the mix, add the creamer until the mixture is smooth but not runny, I never measure so use your own judgement.

After the cupcakes have cooled it is decorating time!!!!!  Use a star tip or a round flat tip, whatever you choose, I went with a star tip this time.  When each cupcake is frosted grab some brown sugar and sprinkle on top, cut your maraschino cherries in half and garnish each cup cake with one pineapple chunk and half a maraschino cherry.  THAT IS IT!

An easy cupcake to do with or for the kids, grown ups will love it to!!!  Enjoy this tasteful blast from the past :)


Pineapple Upside-Down Cupcakes


Wednesday, August 14, 2013

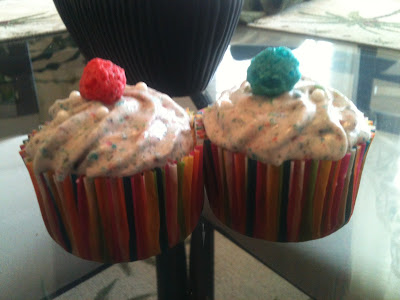
Cap'n Crunch OOPS All Berries Cupcakes

OOPS All Berries Cupcake 

This is one recipe I am not letting go of, I thought of this and I worked with it until it tasted like all you needed to do was pour milk on it! I saw many versions of this cupcake but none that looked right to me so I am sorry but you will have to figure this one out on your own like I did, but enjoy the picture!!! (here is a hint though, I also folded the OOPS All Berries into the batter :)


The Inside of the Cupcake


The Original Cupcake, looked too gray and too much
like a hat for skiing to me, time to tweek again!


Final Results!!

Tuesday, July 16, 2013

Gianduia Mousse Cake

Just LOOK at how high this cake is! so delicious!!!

Gianduia is Italian and is the combination of hazelnut and chocolate. This recipe is unbelievably easy and the results are phenomenal!!!  I got the recipe from Gourmet Magazine about 10 years ago and I have had nothing but great reviews on it since.  The wonderful thing about this cake is that first of all there is NO FLOUR in it at all, the second great thing about this cake is its versatility.  If you put the cake in the refrigerator the consistency is like fudge, but if you take it out and let it sit for a half hour or 45 minutes the consistency is like a delicate mousse!

This cake is extremely rich and decadent and you will only need a small piece, I suggest serving a side of homemade whipping cream and fresh raspberries to cut the richness, or to accentuate it!

**Helpful Tip** I always use semisweet pieces and dark chocolate pieces, it is easier to melt that way, Ghirardelli and Nestle are both good

Cake:
9 ounces fine-quality bittersweet chocolate (not unsweetened)
7 ounces fine-quality milk chocolate
1 cup Nutella * (I always use the entire 13 ounce jar)
3/4 cup unsweetened hazelnut butter (recipe follows)
6 large eggs
1/2 cup superfine granulated sugar

1 cup well-chilled heavy cream


Directions:
Preheat oven to 350° F and butter a 10-inch springform pan. Wrap bottom and side of pan with a large piece of heavy-duty foil to waterproof.

Chop chocolates into small pieces and melt in a double boiler or a metal bowl set over a saucepan of barely simmering water, stirring until smooth. Remove top of double boiler or bowl from heat and stir in Nutella and hazelnut butter until combined well.

In a large bowl of a standing electric mixer or in a large bowl with a handheld mixer beat eggs until frothy, about 1 minute. Gradually add sugar, beating mixture at high speed until thick and pale and it holds a slowly dissolving ribbon when beaters are lifted, about 4 minutes if using a standing mixer and about 8 minutes if using a hand-held mixer. Pour chocolate mixture into egg mixture and stir until combined well. In a chilled bowl beat cream until it holds soft peaks and fold into batter gently but thoroughly.

Pour batter into springform pan and put springform pan in a roasting pan. Add enough hot water to roasting pan to reach halfway up side of springform pan. Bake cake in middle of oven 1 hour and 10 minutes. Turn off oven and let cake stand in oven 40 minutes. Remove springform pan from water and cool cake in pan on a rack 30 minutes. Remove side of pan from cake. Let cake cool completely before serving

Hazelnut Butter
1 1/2 cups hazelnuts (about 7 ounces)
3 tablespoons vegetable oil

Toast and skin hazelnuts, but do not cool. In a food processor grind hazelnuts into a fine paste. Add oil and pulse until combined well. Hazelnut butter may be made 1 week ahead and chilled, covered


A few "dents" in the cake but pretty AND tasty nonetheless


Wednesday, July 10, 2013

Watermelon Shark


Watermelon Shark for Legacy Surf Camp Luau

We have a great youth group at my church, full of wonderful kids and I help as often as I can because they just make me smile, they bring joy to my life and they have potential untapped that they are unaware of........

I cannot even put into words just how fun this was to make! I would loved to have stayed and seen the looks on the kids faces when they saw this!  

It was MESSY to carve but after the juice and seeds were washed off the porch, then the fun began!!!


Wednesday, January 9, 2013

S'Mores Cupcakes

S'Mores Cupcakes
Let me begin by telling you that the search for a decent recipe combination was the reason I decided to go out on my own and do what I saw in my head 

I will admit that I cheated a little and yes, I did it the Sandra Lee thing for the cake, it was a last minute dessert for our youth group at my church and making homemade cake was not an option.  A slight disclaimer.  I use different recipes that I find successful and combine them but I never stick exactly to any one recipe, I tweak it to my own taste, I encourage you to do the same!

1 box Duncan Hines Butter Recipe Cake mix
Dark Chocolate Buttercream (recipe follows)
Marshmallow Buttercream (recipe follows)

Garnish

Mini Marshmallows
Graham Crackers (some crumbled and some broken into pieces)

Dark Chocolate Buttercream 

2/3 cup Hershey Special Dark Chocolate - NOT UNSWEETENED COCOA!!!!
1 stick butter (melt)
3 cups powdered (confectioners) sugar
flavored creamer
this recipe will only top 12 cupcakes if you are as generous with your frosting as I am)

Marshmallow Butter Cream

1 cup softened butter
1 (7 oz) jar marshmallow creme (I used 14 oz)
2 cups confectioners sugar
1 tsp vanilla (I did not use this!)

**warning, even though the original recipe calls for 7 oz. of marshmallow fluff, do NOT follow it unless you have tasted it first!!!! I believe I used double that**


After baking cupcakes chill them in the fridge before working with them.  Fill the cupcakes with the marshmallow filling, you do not need a "filler tip" you can use a standard tip.  Spread a layer of marshmallow frosting on top of cupcake, sprinkle on crumbled graham crackers.

Pipe the chocolate frosting on to the cupcake, sprinkle more crumbled graham crackers on top, garnish with 3 mini marshmallows and a broken piece of graham cracker stuck into the top!

JUST LIKE A CAMPFIRE without the bugs! one of favorite desserts!!!

Saturday, October 6, 2012

Margarita Cake with Tequila Lime Frosting


Sorry folks but if you want the recipe to THIS you will have to look it up and mix and match like I did, this is one secret I am NOT sharing other than to say that I used WAY MORE 1800 Silver Tequila than it called for in the buttercream!!!!


The Tequila used in the Buttercream


Its simply NOT a cake without PLENTY of
Buttercream in every bite!!


Before Garnishing with White Chocolate Shavings

The cake was a hit for the two beautiful people whose birthday's I made the cake for, Chris & Carla, a wonderful couple who met in high school and have been married FOREVER! How weird is it that they almost share the same birthday?  They were well worth the experiment as I have never done this type of cake before

The pictures will give you a slight clue as to what I used but the method and exact measurements will have to be yours to figure out............this time